I pretty much shop exclusively at Home Plus these days. They have more and more western products every time I go; I've gotten so spoiled! It's a little farther away from my apartment than Lotte Mart, but it's worth the extra few minutes in the car (or taxi). If I do pop in to Lotte these days, I'm inevitably disappointed by their low-quality produce (ugh, bananas with fruit flies all over!), limited selection on anything and everything, and their lack of anything western. Over the summer, I joked that if I just had access to an HEB, I'd never leave (HEB is the best grocery store chain EVER, found exclusively in Texas). Home Plus is getting there. It's my favorite of the 3 "big box stores" (Lotte Mart, E-Mart, and Home Plus). Almost everything I use in my kitchen these days is from Home Plus or iHerb.com. My kitchen is my home. I'm a happy pseudo-chef.
With that, today I bring you the third installment of The Expat's Oven! Last month I made the best Mexican casserole I've ever had in Korea (though it pales in comparison to my mama's. She does it differently every time, but it's always AMAZING).
Here's how I did it:
The Expat's Oven: Mexican Chicken Casserole
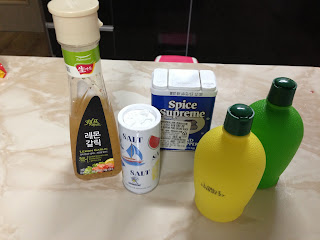
1. Marinate 4 chicken breasts overnight in lemon-garlic salad dressing with salt, pepper, and a squeeze of lemon and lime juice. I'd prefer to use real limes and lemons for this, but real produce is HELLA EXPENSIVE in this country, so a girl's gotta do what a girl's gotta do. Cheater citrus it is.
Pour the chicken and marinade in a pan and bake the chicken at 200*C for 30 minutes or so, til it's no longer pink in the center.
2. While the chicken's in the oven, you can get started on the rest of the casserole fixings. Saute a chopped onion on medium heat. I should have caramelized the onion, but I was anxious to get everything going and I rushed this step. Next time I'll make sure they're a little brown before I start to add everything else.
3. Add a can of black beans and about a cup of (thawed) frozen corn, both found at Home Plus. Don't drain the beans; you're gonna want the extra liquid in the end. (I did drain them and it turned out fine, but in hindsight, I wish I'd made it all a little more soupy. It'd help with the end result.)
4. Realize everything's gonna require much more room than you thought and transfer everything to your larger wok instead of the smaller frying pan.
Mix all of that goodness together.
5. Continue by adding 2 or 3 (I used 2, but next time I'll use 3) little containers of plain yogurt and a few generous shakes of whatever spicy stuff you want. I used garlic powder, taco seasoning, and Tony Chachere's, all things I've brought back or inherited from the USA, and black pepper and fajita seasoning that I bought at Home Plus. (I have been here long enough to have collected a ton of seasonings from expats who left and sold their supply of spices, but if you look around Home Plus or foreign marts in Itaewon, etc., you can find a lot of what you are looking for.)
Korean yogurt - even plain yogurt - is much sweeter than what I'm used to. Don't worry, though. A little sweetness won't hurt in this casserole. It's even a compliment to all the spicy you're going to add, so it works! I have also used plain drinking yogurt for sour cream in other recipes, so that would work here too! I just didn't have any on hand this time. The drinking yogurt isn't as sweet as traditional yogurt for some reason.
Also, if you can find cream of mushroom soup, that is what I always use at home for casseroles. I've heard you can find it at (where else?) Home Plus, but I haven't searched yet. I'll keep y'all posted ;)
Mix all of that goodness together again. Take a deep breath. Sigh with delight.
6. Next, add about 1/4 - 1/2 cup hot (or mild, whatever) salsa and a handful of jalapenos. Both are readily accessible at Home Plus of course.
I should really ask HP to sponsor me.
Add a squirt or two of lemon and lime for fun and flavor and stir.
7. At some point, you will have taken the chicken out of the oven and set it aside to cool. Once it's cooled a few minutes, go ahead and get out a knife and cutting board. Chop up the baked chicken breasts into cubes. You may realize your knife isn't sharp at ALL, so go and sharpen it real fast, then continue on the other 3 pieces. Much better.
8. Stir the cubed chicken into the mix and decide that THIS IS WHAT HEAVEN WILL SMELL LIKE!!!
9. After deciding that your casserole mix is a little monochromatic, check your fridge for some colorful fruit. Find some cherry tomatoes that would do nicely and slice those bad boys up. If you've got bell peppers or the like, they'd be great too. Drop them in and stir. Tomatoes'll cook really quickly, so adding them at the last minute is fine. At home, I usually add a can of Rotel tomatoes with chiles... if anyone finds that over here, let me know! Yum.
I wonder how spinach would do as a last-minute add-in? The dark green would be pretty. I might try that next time. I'd stir it in at this step and let it just barely start to wilt, cause it'd continue cooking in the oven process and I wouldn't want it to be mushy spinach - bleh.
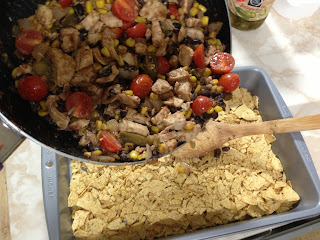
10. Now for the base of the casserole, you can use tortillas or nacho chips - I've used both from time to time, but I prefer crushed nacho chips. Evenly spread the crushed chips at the base of an oven-safe pan, about 1-2 cm thick. (I brought my 9x13 baking pan from America but you can find a good baking pan once in a while in Korea. They're usually kinda pricey. Your best bet may be waiting for someone to sell theirs when they leave.)
Make sure the oven is still heated to 200*C.
You can layer the mix with chips or tortillas as you pour it in the pan, too. I've often layered torn tortilla pieces, mix, chips, cheese, mix, cheese, in whatever order strikes my fancy. Do whatever you want!
12. Top the casserole with about 2 cups of shredded cheese. I got a Mexican blend at Costco a while back, but HP has started to carry grated cheddar! I've yet to try it, but I'm excited that it's there. They also carry Cathedral City cheddar that you can grate yourself (plus it was on sale last month!).
 |
| 10 more points for Home Plus! |
Top the cheese layer with more jalapenos. I de-seeded the ones on top, because I wanted more of the sweet pepper taste without the added heat. I had used seeded jalapenos and hot salsa in the mix, so it was spicy enough. I've kinda been a wimp lately with spicy things... Am I losing my edge? Say it ain't so.
13. Bake the casserole in the oven for roughly 20 minutes, or until the cheese starts looking good and melted. It's all cooked already, so this is just the finalization, solidification part. If you want the cheese browned and crispy, leave it in a little longer. It's up to you!
14. Pull it out of the oven and rejoice! You did it! Get some of that to a plate, STAT!
To compliment the dish, I squeezed some cheater lime into a Corona (praise the Lord, they sell those at Home Plus too!) and pretended I was in Texas for the night. Life is good.
Tip:
Every time I make a casserole, I realize that I'm just ONE person who just made dinner for 8. I invited friends over to help me eat it and still put half of it in the freezer. I love me some Mexican food, but I don't really want to eat the same exact thing for lunch and dinner for 4 days in a row. Individual portions in the freezer make for super easy school lunches the next week without letting your casserole go stale in the fridge. Hooray!


No comments:
Post a Comment